Table of Contents
- Introduction
- What is Clerk
- What is MongoDB
- So What makes it different from SQL Databases
- How to Setup Clerk in a Next.js Project
- What to do Next ?
- It's time to start with MongoDB
- Sync Clerk DB with MongoDB using Webhooks
- Conclusion
Clerk Auth & MongoDB
Introduction
In this guide, we’re going to explore how to integrate Clerk authentication with a Next.js application, connect it to a MongoDB database, and handle user events using webhooks. This will involve setting up a user management system, storing user data in a database, and responding to user events in real-time.
Here are the prerequisites for this guide:
- Next.js: We’ll be using Next.js, a popular React framework for building web applications. You should have a basic understanding of how to create and run a Next.js application.
- TypeScript: Our application will be written in TypeScript, a statically typed superset of JavaScript. You should be familiar with TypeScript syntax and concepts.
- Backend Knowledge: This guide involves setting up a backend server, connecting to a database, and handling HTTP requests. Therefore, you should have some knowledge of backend development concepts.
This guide assumes that you have a basic understanding of these technologies and concepts. If you’re not familiar with any of them, I recommend doing some research and getting comfortable with them before proceeding. Happy coding!
What is Clerk
Clerk is a user management platform for applications. It provides a set of user interfaces, APIs, and admin dashboards to authenticate and manage users. It includes features like sign-in, sign-up, user profile, and more. It also ensures security with features like multifactor authentication and session management.
What is MongoDB
MongoDB is a database program that stores data in flexible, JSON-like documents. It’s classified as a NoSQL database, which means it doesn’t use the traditional table-based relational database structure. This makes it more flexible and scalable, and it can handle different types of data, including structured, semi-structured, and unstructured data.
So What makes it different from SQL Databases
SQL (Structured Query Language) and NoSQL are both types of databases used for storing data, but they have different structures and uses. SQL databases use tables and relations to store data, making them ideal for structured data. On the other hand, NoSQL databases, like MongoDB, are more flexible and can handle various types of data. Despite their differences, both SQL and NoSQL databases support data storage and queries.
How to Setup Clerk in a Next.js Project
- Install
@clerk/nextjs:
npm install @clerk/nextjs
- Set your environment variables :
- Navigate to the Clerk Dashboard.
- In the navigation sidebar, select API Keys.
- In the Quick Copy section, copy your Clerk publishable and secret key.
- Paste your keys into your
.env.localfile.
NEXT_PUBLIC_CLERK_PUBLISHABLE_KEY=YOUR_PUBLISHABLE_KEY
CLERK_SECRET_KEY=YOUR_SECRET_KEY
- Add Middleware to your application :
clerkMiddleware()grants you access to user authentication state throughout your application, on any route or page. It also allows you to protect specific routes from unauthenticated users. To addclerkMiddleware()to your application, follow these steps:
- Create a
middleware.tsfile. - If you are using the/srcdirectory, themiddleware.tsfile should be placed inside the/srcdirectory - If you are not using the/srcdirectory, placemiddleware.tsin the root directory alongside.env.local
- In your middleware.ts, export Clerk's
clerkMiddleware()helper:
- Create a
import { authMiddleware } from "@clerk/nextjs";

// See https://clerk.com/docs/references/nextjs/auth-middleware
// for more information about configuring your Middleware

export default authMiddleware({
  // Allow signed out users to access the specified routes:
  // publicRoutes: ['/anyone-can-visit-this-route'],
  // Prevent the specified routes from accessing
  // authentication information:
  // ignoredRoutes: ['/no-auth-in-this-route'],
  publicRoutes: ["/"],
});

export const config = {
  matcher: [
    // Exclude files with a "." followed by an extension, which are typically static files.
    // Exclude files in the _next directory, which are Next.js internals.
    "/((?!.+\\.[\\w]+$|_next).*)", // Re-include any files in the api or trpc folders that might have an extension

    "/(api|trpc)(.*)",
  ],
};
- By default,
clerkMiddleware()will not protect any routes. All routes are public and you must opt-in to protection for routes. See theclerkMiddleware()reference to learn how to require authentication for specific routes.
- Add
ClerkProviderand components to your app :
import { ClerkProvider } from "@clerk/nextjs";
import "./globals.css";
import React from "react";
import { ThemeProvider } from "@/context/ThemeProvider";

  children
export default function RootLayout({
  children,
}: {: React.ReactNode;
}) {

  return (
    <html lang="en">
      <body className={`${inter.variable} ${spaceGrotesk.variable}`}>
        <ClerkProvider
          appearance={{
            elements: {
              formButtonPrimary: "primary-gradient",
              footerActionLink: "primary-text-gradient hover:text-primary",
            },
          }}
        >
          <ThemeProvider>{children}</ThemeProvider>
        </ClerkProvider>
      </body>
    </html>
  );
}
What to do Next ?
Next.js: Build your own sign-in and sign-up pages for your Next.js app with Clerk
It's time to start with MongoDB
Sure, here’s how you can set up MongoDB and Mongoose in a Next.js project:
- Install MongoDB and Mongoose: Run
npm install mongodb mongoosein your terminal to add MongoDB and Mongoose as dependencies in your project.
- Create a MongoDB Atlas Account: Visit the official MongoDB Atlas page and sign up for a free-tier account. Fill in the required fields and click “Create your Atlas account”. You will be sent an email verification.
- Create a Cluster: After verifying your email, log in to your MongoDB Atlas account and create a new cluster. This will be the database your application connects to.
- Get Your Connection String: Once your cluster is set up, you’ll be provided with a connection string. This is the URL your application will use to connect to your MongoDB database.
- Set Up Environment Variables: Store your connection string in an environment variable in your
.env.localfile. This keeps it secure and separate from your main code. Your.env.localfile should look something like this:
MONGODB_URL=mongodb+srv://<username>:<password>@cluster0.mongodb.net/ProjectName?retryWrites=true&w=majority
- Create a Connection Utility: In your project, create a new file called
mongoose.ts. This file will export a function that connects to MongoDB using Mongoose. Here’s what yourmongoose.tsfile should look like:
import mongoose from "mongoose";

let isConnected: boolean = false;

export const connectToDatabase = async () => {
  mongoose.set("strictQuery", true);

  if (!process.env.MONGODB_URL) return console.log("🔴 MISSING MONGODB_URL");

  if (isConnected) {
    return console.log("🟢 Already connected to MONGODB");
  }

  try {
    await mongoose.connect(process.env.MONGODB_URL, {
      // The Same DB name you used in MongoDB Atlas
      dbName: "DBName",
    });
    isConnected = true;
    console.log("🟢 Connected to MONGODB");
  } catch (error) {
    console.log("🔴 Error connecting to MONGODB", error);
  }
};
- Use Mongoose to manipulate the DB in Server Actions : Absolutely, here’s an explanation of the code you provided:
"use server";

import User from "@/database/user.model";
import { connectToDatabase } from "../mongoose";
import {
  CreateUserParams,
  DeleteUserParams,
  GetUserByIdParams,
  UpdateUserParams,
} from "./shared.types";
import { revalidatePath } from "next/cache";

// This function retrieves a user by their ID from the MongoDB database.
export async function getUserByID(params: GetUserByIdParams) {
  try {
    connectToDatabase();

    const { userId } = params;

    const user = await User.findOne({ clerkId: userId });

    return user;
  } catch (error) {
    console.error("🔴 Error getting user: ", error);
    throw error;
  }
}

// This function creates a new user in the MongoDB database.
export async function createUser(userData: CreateUserParams) {
  try {
    connectToDatabase();
    const newUser = await User.create(userData);
    return newUser;
  } catch (error) {
    console.log("🔴 Error creating user: ", error);
    throw error;
  }
}

// This function updates a user's data in the MongoDB database.
export async function updateUser(params: UpdateUserParams) {
  try {
    connectToDatabase();
    const { clerkId, updateData, path } = params;
    await User.findOneAndUpdate({ clerkId }, updateData, { new: true });

    revalidatePath(path);
  } catch (error) {
    console.log("🔴 Error creating user: ", error);
    throw error;
  }
}

// This function deletes a user from the MongoDB database.
export async function deleteUser(params: DeleteUserParams) {
  try {
    connectToDatabase();
    const { clerkId } = params;
    const deletedUser = await User.findOneAndDelete({ clerkId });
    if (!user) {
      throw new Error("User not found");
    }

    return deletedUser;
  } catch (error) {
    console.log("🔴 Error creating user: ", error);
    throw error;
  }
}
In this code, you have a server actions file user.actions.ts with functions to handle CRUD (Create, Read, Update, Delete) operations for a User model in MongoDB. Each function connects to the MongoDB database using the connectToDatabase function from the mongoose.ts file.
getUserByID: This function retrieves a user by their ID from the MongoDB database.createUser: This function creates a new user in the MongoDB database using the data passed to it.updateUser: This function updates a user’s data in the MongoDB database. It also revalidates the path.deleteUser: This function deletes a user from the MongoDB database.
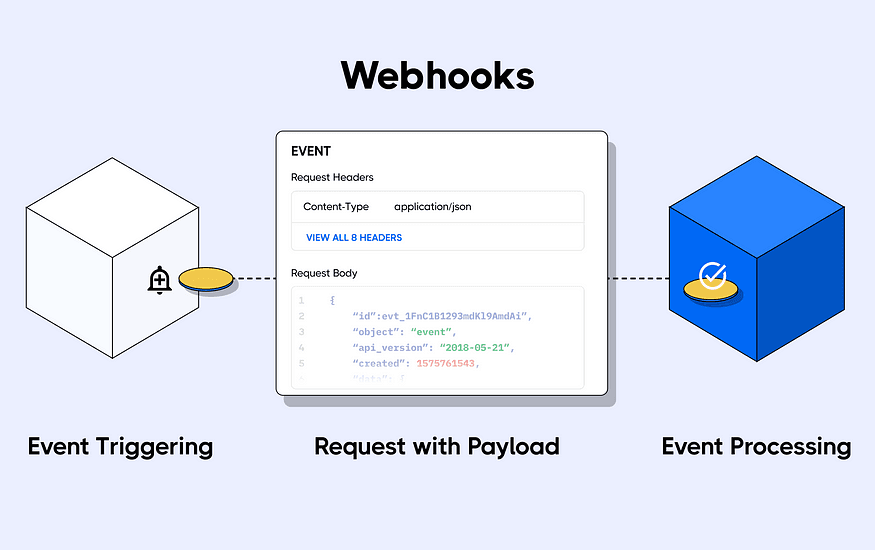
Sync Clerk DB with MongoDB using Webhooks
You’ve covered the main steps to set up Clerk and MongoDB in a Next.js project. Now Let's start to link these two so each time we get an event in our Clerk application we trigger a change in our MongoDB database:
- Host the Website on Vercel: You can host your Next.js project on Vercel. After creating an account on Vercel, you can import your project from a Git repository and deploy it.
- Set Up Webhooks in Clerk: In the Clerk dashboard, go to the Webhooks page and click on the “Add Endpoint” button. Enter the URL of your webhook endpoint, which would be something like
https://your-website.com/api/webhook. Choose the events you want to listen to, in this case, user events.
- Add
NEXT_CLERK_WEBHOOK_SECRETto.env.local: TheNEXT_CLERK_WEBHOOK_SECRETis the secret key used to verify the webhook payload from Clerk. You can find this in the Clerk Dashboard -> Webhooks -> choose the endpoint. Add this key to your.env.localfile in your project.
- Install
svix: You will usesvixto verify the webhook signature. Install it by running the following command in your terminalnpm install svix
- Create a Webhook Endpoint: In your Next.js project, create a new API route at
api/webhook/routes.ts. This file will handle the incoming webhook events from Clerk.
"use server";

import User from "@/database/user.model";
import { connectToDatabase } from "../mongoose";
import {
  CreateUserParams,
  DeleteUserParams,
  GetUserByIdParams,
  UpdateUserParams,
} from "./shared.types";
import { revalidatePath } from "next/cache";

export async function POST(req: Request) {
  // You can find this in the Clerk Dashboard -> Webhooks -> choose the endpoint
  // TODO : Add the WEBHOOK_SECRET to your .env file
  const WEBHOOK_SECRET = process.env.NEXT_CLERK_WEBHOOK_SECRET;

  if (!WEBHOOK_SECRET) {
    throw new Error(
      "Please add WEBHOOK_SECRET from Clerk Dashboard to .env or .env.local"
    );
  }

  // Get the headers
  const headerPayload = headers();
  const svix_id = headerPayload.get("svix-id");
  const svix_timestamp = headerPayload.get("svix-timestamp");
  const svix_signature = headerPayload.get("svix-signature");

  // If there are no headers, error out
  if (!svix_id || !svix_timestamp || !svix_signature) {
    return new Response("Error occured -- no svix headers", {
      status: 400,
    });
  }

  // Get the body
  const payload = await req.json();
  const body = JSON.stringify(payload);

  // Create a new Svix instance with your secret.
  const wh = new Webhook(WEBHOOK_SECRET);

  let evt: WebhookEvent;

  // Verify the payload with the headers
  try {
    evt = wh.verify(body, {
      "svix-id": svix_id,
      "svix-timestamp": svix_timestamp,
      "svix-signature": svix_signature,
    }) as WebhookEvent;
  } catch (err) {
    console.error("Error verifying webhook:", err);
    return new Response("Error occured", {
      status: 400,
    });
  }

  // Do something with the payload
  // For this guide, you simply log the payload to the console

  const eventType = evt.type;
  console.log(eventType);
  if (eventType === "user.created") {
    const { id, email_addresses, image_url, username, first_name, last_name } =
      evt.data;
    const mongoUser = await createUser({
      clerkId: id,
      name: `${first_name} ${last_name ? `${last_name}` : ""}`,
      email: email_addresses[0].email_address,
      username: username!,
      picture: image_url,
    });

    return NextResponse.json({ message: "User created ", user: mongoUser });
  } else if (eventType === "user.updated") {
    const { id, email_addresses, image_url, username, first_name, last_name } =
      evt.data;
    const mongoUser = await updateUser({
      clerkId: id,
      updateData: {
        name: `${first_name} ${last_name ? `${last_name}` : ""}`,
        email: email_addresses[0].email_address,
        username: username!,
        picture: image_url,
      },
      path: `/profile/${id}`,
    });

    return NextResponse.json({ message: "User updated ", user: mongoUser });
  }
  if (eventType === "user.deleted") {
    const { id } = evt.data;
    const deletedUser = await deleteUser({
      clerkId: id!,
    });
    return NextResponse.json({ message: "User deleted ", user: deletedUser });
  }

  return new Response("", { status: 200 });
}
The code snippet shows how to handle the POST request in your webhook endpoint. It verifies the webhook payload using the Webhook class from the svix package. Then, based on the event type, it performs different actions such as creating, updating, or deleting a user in your MongoDB database
Conclusion
We’ve successfully set up Clerk authentication in a Next.js application, connected it to MongoDB, and handled user events using webhooks.
To test if the webhooks are working, you can use the “Send Test” feature in the Clerk dashboard. This will send a test event to your webhook endpoint. If the endpoint is set up correctly, you should see a successful response in the dashboard.
If you encounter any errors, check the deployment logs on Vercel. They provide detailed information that can help you debug the issue.
Thank you for following this guide. If you have any questions or face any issues, feel free to ask.